Event website - Quick start guide

Every Eventplot event includes a website. Use the Website Editor to design pages, drop in content blocks, and preview how visitors will see your event. When you publish, the same layout goes live — and stays connected to your vendors, performers, stages, schedule, and map.
You do not need a finished event to start. Build the shell first, then refine as your content grows.
Open the Website Editor
In the event sidebar, open Website Editor.
The main area shows a live preview of your site. On larger screens, Website Editor settings sit in the panel on the right. On smaller screens, tap Settings to open them.
Use the desktop and mobile icons in the preview header to check both layouts.
[Image: Website Editor — page list in the sidebar, live preview centre, settings panel on the right]
Understand draft and live
The editor works on a draft copy of your site. The preview shows your latest changes immediately.
- Switch to Published at the bottom of the settings panel when you are ready to go live.
- After the site is published, click Save to push further edits to the live site.
- Reset discards unpublished draft changes and restores the last published version.
Tip: You can keep editing in draft while the site stays live — nothing changes for visitors until you click Save.
Manage pages
Pages are listed in the sidebar under Website Editor (and in the event sidebar when you are on the editor).
- Home and 3D Map are built-in pages — you can hide them but not delete them.
- Click + to add a new page. Rename it with Page Name in the settings panel.
- Drag pages to reorder them. Home always stays first.
- Use the eye icon to hide a page from the public navigation without deleting it.
New events start with starter pages (Home, 3D Map, Lineup, Performers, Vendors). Treat these as a starting point — rearrange, rename, or hide anything you do not need.
Set site-wide style
At the top of the settings panel, Site style controls spacing, font size, heading font, and body font for the whole site.
Your event logo and Colour Palette come from Branding & images — upload those first if you want the site to match your brand.
Build a page with blocks
For each page (except 3D Map), the settings panel shows Page Layout on the left and Page Blocks on the right.
- Drag blocks from Page Blocks into Page Layout.
- Drag blocks within the layout to reorder them.
- Click a block in the layout to select it — its settings appear below.
- Drag a block out of the layout to remove it.
Every page includes a fixed Header at the top. Select it to set the navigation Title, Subtitle, and Logo Colour.
You can add an optional Footer block (one per page). Footer contact details apply across every footer on the site.
Page blocks you can use:
Hero, Text, Image, Fit Text, Button, Stages, Performers, Vendors, Facilities, Sponsors, Timeline, Location Map, Divider, Columns, Panels, Tabs, Box, 3D Map, Footer
Some blocks can only appear once on a page (Hero, Footer, Panels). The 3D Map block belongs on the dedicated 3D Map page — that page is map-only.
Tip: Use Columns, Box, Tabs, or Panels to group blocks side by side or in sections.
Add live event content
Resource blocks pull from your event automatically — you do not re-enter vendor or performer details on the website.
- Stages, Performers, Vendors, Sponsors, and Facilities show Published items from your event lists.
- Timeline shows your schedule (timeline or list view — configurable in block settings).
- Filter performers by stage or scheduled/unscheduled in Performers block settings.
Note: Publishing a profile on Vendors, Performers, Stages, or Sponsors makes it eligible for the website. Unpublished items stay internal.
As you update event content, the website reflects those changes — you only need to Save when you change the website layout or block settings themselves.
Configure the 3D Map page
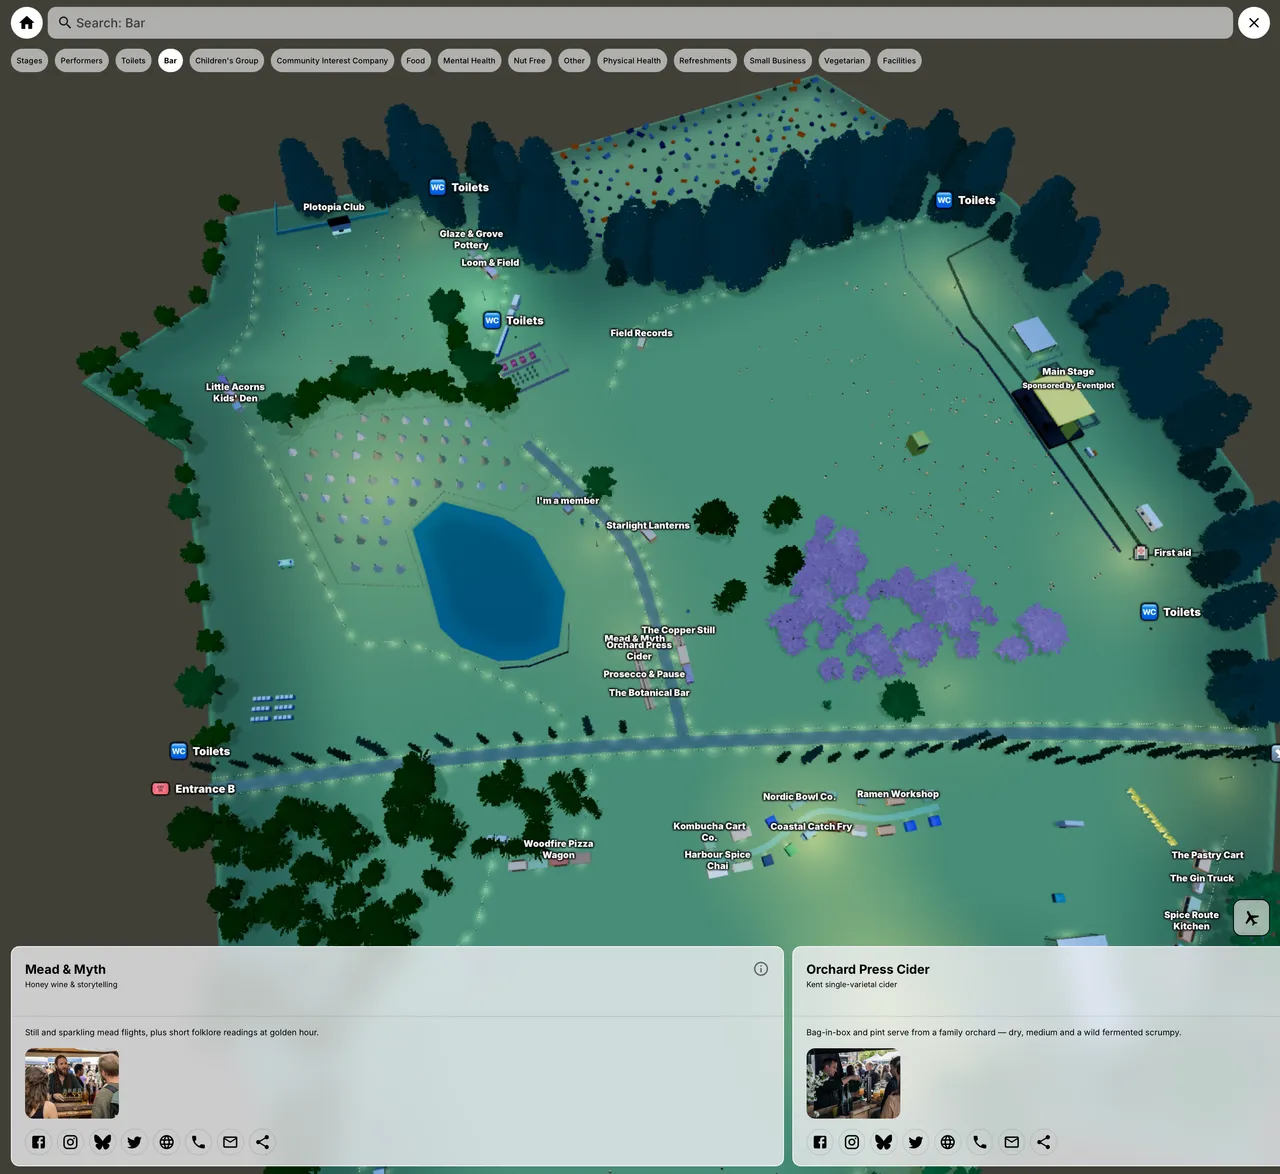
Open the 3D Map page from the sidebar. The preview shows your interactive public map.
In settings you can adjust:
- Explorer overlay — search and category chips for visitors
- Labels — how map labels appear at different zoom levels
- Scene Settings — map style, lighting (Real Time, Day, Night, Theme), labels, and rotation
This is the same map you build on the Planning Map, presented for attendees. Keep your map and published resources up to date and the website map follows.
Publish and share
- Switch Private → Published at the bottom of the settings panel.
- Once live, use Preview (play icon) to open the public site in a new tab.
- Use Share to send the link — or copy it to the clipboard.
By default the public URL is on Eventplot (/events/your-event/public-website). For your own domain, set up Custom public website domain in Event Settings (CNAME + TXT verification).
What visitors see
On the published site, visitors can:
- Browse pages from the navigation menu
- View published vendors, performers, stages, and sponsors
- Open detail views by clicking a card (profile, schedule times, images, links)
- Explore the 3D Map page interactively
- See live schedule information on stage labels during the event (when configured on your map)
The public website and Public Map are related but separate routes — many organisers feature the map as a dedicated page on the site.
Next steps
- Add or publish more Vendors, Performers, and Stages
- Build your Schedule so Timeline and performer blocks show times
- Refine the Planning Map — layout changes flow through to the website map
- Customise individual block settings (hero images, grid layouts, category filters)
Most organisers can publish a usable site in minutes, then keep polishing the design as the event takes shape.